
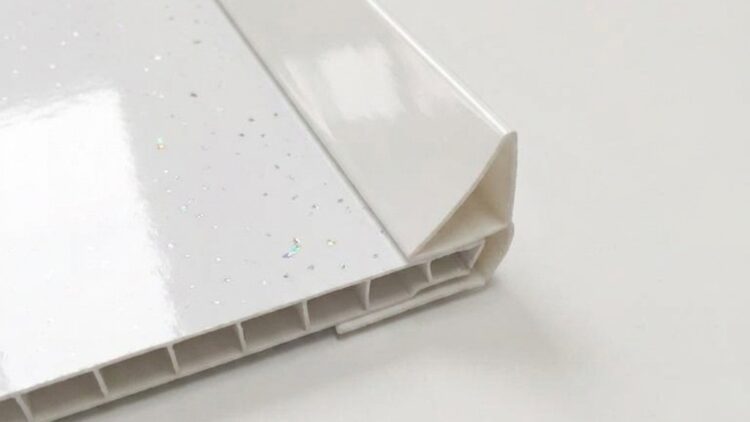
Ceiling Coving Trim: 5 Simple Steps to a Perfect Finish
Are exposed panel joins ruining the clean look of your bathroom or kitchen ceiling? A poorly finished edge can make even the best PVC cladding look unfinished. That is where a ceiling coving trim comes in. This simple finishing piece covers the join between wall panels and the ceiling, creating a smooth, professional edge without extra plastering or filler.
Whether you are a DIY homeowner tackling your first bathroom refit or a tradesperson fitting cladding for a client, getting the ceiling coving trim right makes all the difference. In this guide, we will explain what it is, why it works so well, how to fit it, and how to pick the correct size and colour for your project.
What Is a Ceiling Coving Trim and Why It Matters
A ceiling coving trim is a curved PVC finishing strip designed to sit at the point where wall cladding panels meet the ceiling. Rather than leaving a rough, uneven join, the trim creates a neat, rounded transition that hides cut edges completely and gives the whole wall a finished, purpose-built look.
Unlike traditional plaster coving, this style of trim is fully waterproof, making it ideal for bathrooms, kitchens, and other high moisture rooms where plaster would eventually absorb damp and crack. It clips or glues directly onto the top of your panels, so there is no need for specialist plastering skills, sanding, or painting once it is fitted.
Trims of this type are often supplied alongside quadrant trims, which serve a similar purpose but with a squarer profile. Coving style trims give a softer, more rounded look, which suits both modern and more traditional bathroom schemes. For anyone installing PVC wall panels, adding this trim is often the final step that turns a good finish into a great one.
Most homeowners first come across this style of trim when they notice a small gap or shadow line where their new panels meet the ceiling. Left unfinished, that gap can trap dust, show daylight through the join, or simply look like an unfinished DIY job to visitors and buyers alike. A properly fitted trim solves all three problems in one simple step.
Benefits of a Ceiling Coving Trim Over Other Finishes
Choosing a ceiling coving trim instead of traditional coving or filler brings several practical advantages. Because it is made from PVC, it will not crack, chip, or absorb moisture the way plaster coving can over time, and it will not need repainting every few years.
Installation is also far quicker, since the trim simply slots or glues into place rather than requiring wet trades, sanding, and drying time. It cuts easily with a Stanley knife or hacksaw, so both DIYers and professional installers can achieve a tidy result without specialist tools or training.
For anyone already fitting bathroom cladding, adding a ceiling coving trim keeps the whole project consistent, waterproof, and low maintenance from wall to ceiling. It also means the join never needs re-caulking the way a tiled ceiling edge sometimes does.
How to Install a Ceiling Coving Trim in 5 Simple Steps
Fitting a ceiling coving trim is a straightforward job that most confident DIYers can complete in an afternoon, and most trade professionals can fit an average bathroom in under an hour. You will need a tape measure, a Stanley knife or hacksaw, a suitable panel adhesive, a clean cloth, and a small filler blade for spreading the adhesive evenly. No power tools, sealant guns, or specialist trims are required beyond the trim itself.
Before you begin, lay all of your cut lengths out on the floor so you can check they fit the room without gaps. It is much easier to trim a piece slightly shorter before gluing than to try and fix a mistake once the adhesive has set. Follow these steps for a professional result.
- Measure the length of wall where the trim will sit, allowing a little extra for trimming, and check the ceiling line is reasonably straight before you begin.
- Cut the trim to size using a Stanley knife or hacksaw, keeping the cut edge as square as possible so the corners meet neatly.
- Apply a bead of panel adhesive along the back of the ceiling coving trim before offering it up to the join between the panel and the ceiling.
- Press the trim firmly into place, running your hand along the length to bond it evenly and squeeze out any trapped air.
- Wipe away any excess adhesive immediately and leave the trim to set fully before final cleaning or decorating around it.
Common Mistakes to Avoid When Fitting Ceiling Coving Trim
Even a simple job like this can go wrong without a little care. One common mistake is cutting the ceiling coving trim too short, which leaves a visible gap at the corner that draws the eye straight to the flaw.
Another is applying too much adhesive, which can squeeze out and mark the panel surface below. Skipping a dry fit before gluing is also a frequent error, since walls are rarely perfectly straight and the trim may need slight trimming to sit flush.
Finally, avoid fitting a ceiling coving trim in a cold room, as low temperatures can affect how well the adhesive bonds and may extend the curing time considerably.
Choosing the Right Ceiling Coving Trim for Your Project
Not every ceiling coving trim is the same size or finish, so it pays to check your panel thickness and room style before ordering. Standard lengths run to around 2700mm, which suits most domestic ceiling heights without extra joins.
Trims are typically available in white and chrome to match your existing wall panels, with white suiting most bathrooms and chrome working well against darker, more contemporary panel colours. If you are working on a larger commercial fit or a full bathroom refurbishment, buying your trim alongside matching internal corners, external corners, and starter trims from our finishing trims range keeps the whole job consistent.
We also offer free delivery over £100 and next-day delivery on most orders, so your ceiling coving trim and matching panels can arrive together and your project does not have to wait.
Frequently Asked Questions
Can I fit a ceiling coving trim myself? Yes. Most homeowners with basic DIY confidence can fit it in an afternoon using only a Stanley knife, tape measure, and panel adhesive.
Does it need painting? No. The trim is supplied in a finished colour, either white or chrome, and does not require any decorating once installed.
Will it work with existing tiles? A coving trim is designed for use with PVC wall panels rather than ceramic tiles, so it is best suited to a full cladding installation.
How do I clean it once fitted? A soft cloth and warm soapy water is all that is needed. Because the surface is non-porous, there is nothing for mould or soap scum to cling to, unlike traditional grouted joints.
Can it be used outside a bathroom? Yes. Many customers fit this trim in kitchens, utility rooms, and commercial washrooms where a clean, waterproof ceiling join is just as important as it is in a bathroom.
Ready to Get Started
A neatly fitted ceiling coving trim is a small detail that makes a big difference to the finished look of any cladding project. Building regulations mainly cover structural work and insulation rather than decorative trims, but it is worth checking the Planning Portal guidance on ceilings and floors if your project involves any structural changes to the room.
Not sure which panel or system suits your needs? Our team is happy to help, contact us today.