
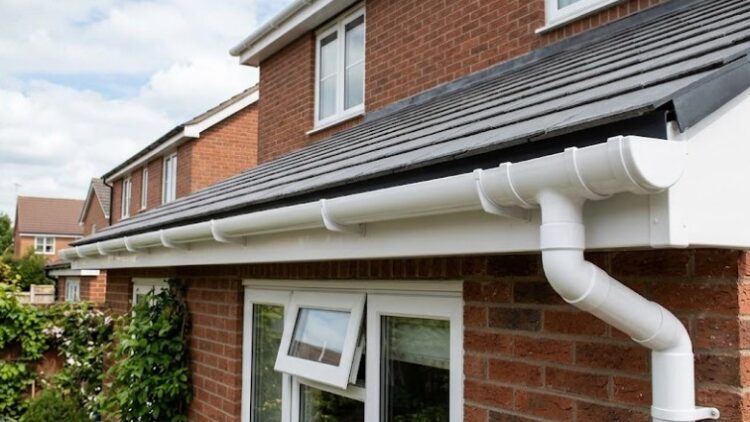
How to Install Guttering Properly on Your Home
How to Install Guttering: A Simple Step-by-Step Guide for Lancashire Homes
Knowing how to install guttering is one of those practical DIY skills that can save you a significant amount of money and protect your property from water damage at the same time. Whether you are replacing a tired old system or fitting new guttering on an extension or outbuilding, the job is well within reach for most homeowners with basic DIY ability.
This guide walks you through every stage of how to install guttering clearly, from choosing the right system to fitting the downpipe and testing the finished result.
Why Proper Guttering Matters
Before covering how to install guttering in detail, it helps to understand what the system actually does. Guttering collects rainwater from the roof and channels it safely away from the building via downpipes and into the drainage system. Without a properly working rainwater system, water can run down the walls, seep into brickwork, cause damp, and damage the foundations over time.
In the Lancashire, where rainfall is consistent throughout the year, a blocked, leaking, or poorly fitted gutter can cause serious problems quickly. Understanding how to install guttering to the correct standard is the first step to avoiding these issues. Learning how to install guttering correctly from the start means fewer issues down the line and a system that lasts for many years without much attention.
Choosing the Right PVC Guttering System
Most Lancashire, especially Blackpool homes now use uPVC rainwater systems. PVC is lightweight, does not rust or corrode, requires no painting, and is straightforward to cut and connect. Celplas supplies a full range of PVC guttering in half round, square, and ogee profiles, available in white, black, and brown to suit any property.
Choosing the right profile and size matters. When planning how to install guttering, the most common profile options are:
- Half round guttering: The standard profile for most domestic properties. Compatible with most manufacturers and ideal for straightforward replacements.
- Square guttering: Higher flow capacity than half round. A good choice for larger roofs or areas with heavier rainfall.
- Ogee guttering: A decorative curved profile popular on period and Victorian-style properties. Also a high-capacity system.
As a rule of thumb, one downpipe is needed for every 6 to 12 metres of guttering. For larger roof areas, sizing up to a deep-flow or high-capacity profile is worth considering before you begin.
Tools and Materials You Will Need
Before starting, make sure you have everything on hand. Stopping mid-job to collect parts wastes time and can leave the roofline exposed. Here is what you need to have ready before you begin how to install guttering:
- Gutter lengths (in your chosen profile and colour)
- Fascia brackets and union brackets
- Running outlet or stop end outlet
- Stop ends (left and right)
- External and internal angles (if the run goes around corners)
- Downpipe lengths, downpipe clips, and offset bends
- Hacksaw or fine-tooth saw
- Tape measure, pencil, spirit level
- String line and plumb bob
- Drill and screwdriver bit
- Silicone lubricant spray
- Safety goggles and gloves
- Ladder (EN131 rated with a stabiliser bar)
Celplas stocks free delivery on orders over £100, so it is worth ordering all components in one go to keep the project moving.
How to Install Guttering Step by Step
This is the core section covering how to install guttering on a standard domestic property. Follow each step in order for the best result. The steps below apply to all PVC profiles including half round, square, and ogee systems.
Step 1: Check and Prepare the Fascia
Before fitting anything, inspect the fascia boards along the roofline. Rotten or damaged timber must be replaced before new guttering goes up. Fitting new guttering to a compromised fascia is one of the most common installation mistakes. If you are replacing old guttering, remove it carefully and clean the fascia surface.
Step 2: Position the Running Outlet
The running outlet connects the gutter to the downpipe and is the starting point for any installation. Hold a plumb line against the fascia directly above the drain position and mark the fascia with a pencil. Fit the outlet no more than 50mm below the level of the roof tiles. Fix it using 25mm x 5mm round-head stainless steel screws. Do not use countersunk screws as these can over-torque and damage the fitting.
Step 3: Set the Fall with a String Line
Water will not drain unless the gutter runs slightly downhill toward the outlet. Fit a fascia bracket at the highest point of the run, at the opposite end from the outlet. Stretch a string line from this bracket down to the outlet and check that there is a consistent fall of around 3mm per metre toward the outlet. A 1:350 gradient is the standard recommendation. This string line is your guide for fitting every bracket along the run.
Step 4: Fix the Fascia Brackets
Working along the string line, mark the position of each bracket on the fascia. Space brackets no more than 1 metre apart for standard systems and no more than 150mm from any corner, union, running outlet, or stop end. In areas prone to heavy snowfall, reduce bracket spacing to 600mm. Drill pilot holes and fix each bracket securely, checking it aligns with the string line before moving on.
Step 5: Fit the Gutter Lengths
This is the part of how to install guttering that most people skip. Spray silicone lubricant on all gutter seals before fitting. This makes the job much easier and helps with expansion and contraction over time. Starting at the outlet, tilt each gutter length so it sits beneath the back clip of the bracket, then push down at the front until it clips into position. Fit a union bracket at the end of each length before connecting the next section. Ensure all joints line up with the depth mark inside the fitting.
Wickes recommends cutting guttering to size with a hacksaw and de-burring any cut edges with a file or sandpaper to ensure a clean, watertight fit. Fit a stop end at the open end of the run to complete it.
Step 6: Fit the Downpipe
Drop a plumb line from the running outlet straight down to the drain to mark the line for the downpipe on the wall. Attach an offset bend to the base of the running outlet to bring the pipe back to the wall, then fit the downpipe lengths from top to bottom. Secure each length with downpipe clips at intervals no greater than 1.8 metres. Fit a shoe at the base of the downpipe to direct water into the drain.
Step 7: Test the System
Once you have finished the main stages of how to install guttering, test the system. Pour water along the gutter from the high end and watch it flow toward the outlet and down the pipe. Check all joints and connections for drips. Any leaking joint can usually be fixed quickly with a waterproof silicone sealant applied to a clean, dry surface.
How to Install Guttering: Common Mistakes to Avoid
Even with the right materials and a good understanding of how to install guttering, a few common errors can cause problems. Keep these in mind when carrying out the work.
- Wrong fall angle: Too little slope means water sits in the gutter and overflows. Too steep a fall can cause water to run past the outlet. Stick to 3mm per metre.
- Bracket spacing too wide: Guttering that sags between brackets will collect debris and standing water. Space brackets correctly from the start.
- Mixing brands without adaptors: Different PVC guttering brands may not be directly compatible. Use a gutter adaptor if joining two different systems.
- Fitting to rotten fascia: New brackets screwed into soft timber will not hold. Always replace damaged fascia before fitting the rainwater system.
- Skipping the silicone lubricant: Dry seals are harder to seat correctly and can cause leaks. Always spray before fitting.
How to Install Guttering on an Outbuilding or Extension
The same process for how to install guttering applies when working on a garage, garden office, or extension. For smaller structures with a single-pitched roof, a mini gutter system may be more appropriate than full domestic-sized profiles. Celplas can advise on the best profile and size for the roof area you are working with. The key difference on outbuildings is that the fascia is often thinner, so check fixing depth before drilling.
Order Today
If you need materials to complete how to install guttering on your property, Celplas supplies a complete range of PVC guttering systems from our base in Blackpool, with options in half round, square, and ogee profiles in a choice of colours. Everything you need to complete how to install guttering on any domestic property, including brackets, outlets, angles, downpipes, and clips, is available to order online with free delivery on orders over £100.
Browse our full range online or call 01253 591 717 to speak with one of our product specialists. For more installation guides and product advice, visit the Celplas blog. Ready to get started? Contact the Celplas team and we will help you find everything you need for your project.